
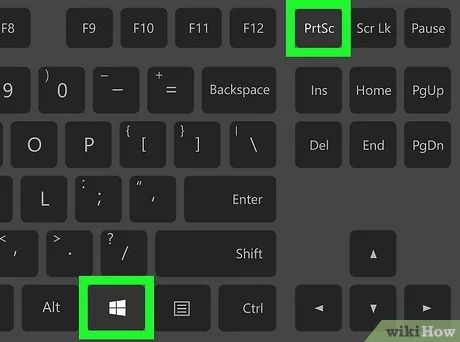
To screenshot on a Dell laptop, press the “PrtScn” key to capture the entire screen. Then, paste the screenshot into an image editing software for further editing.
Capturing your screen on a Dell laptop is a simple process that allows you to save and share important information with ease. Whether you want to capture a funny conversation, save a shopping receipt, or document an error message, taking a screenshot can be a handy tool in various situations. read more
By following these easy steps, you can quickly capture and save any information displayed on your Dell laptop screen. In this guide, we will walk you through the step-by-step process of taking a screenshot on your Dell laptop using the built-in Windows tools.
Credit: www.businessinsider.com
How to Screenshot on a Dell Laptop: Using Built-in Windows Tools
In this blog post, we will discuss how to take a screenshot on a Dell laptop using the built-in Windows tools. One of the simplest methods is by using the Print Screen (PrtScn) key on your keyboard. By pressing this key, you can capture the entire screen and save it to the clipboard. To access the screenshot, open an image editor program such as Microsoft Paint and paste the screenshot (Ctrl+V). Another built-in tool called the Snipping Tool offers more functionality. It allows you to take screenshots of a specific area, window, or the entire screen. To use the Snipping Tool, simply open the program, select the desired screenshot type, and click on “New.” Once you have taken the screenshot, you can save it or make further edits using the built-in editing tools provided.
Using Third-party Software
When it comes to screenshots on a Dell laptop, using third-party software can be beneficial. These tools offer a variety of features that may not be available on the default screenshot options. One of the recommended software for Dell laptops is Snagit. Snagit allows you to capture a specific region, window, or entire screen with ease. Another great option is Lightshot, which offers quick and easy editing tools for your screenshots. With the help of these third-party software, you can enhance your screenshotting experience on your Dell laptop.
Editing And Saving Screenshots
To edit and save screenshots on a Dell laptop:
Using Built-in Windows Tools for Editing: Windows Snipping Tool allows for quick and easy editing options like cropping and highlighting.
Using Third-Party Editing Software: Applications like Lightshot and Snagit provide more advanced editing features for professional-looking screenshots.
:max_bytes(150000):strip_icc()/A2-TakeaScreenshotonaDellLaptop-annotated-ec47a86d15a142dc8eb5a740ef6d3284.jpg)
Credit: www.lifewire.com
Troubleshooting
Have trouble taking a screenshot on your Dell laptop? Here’s a quick troubleshooting guide. Simply press the “Print Screen” key, then paste the screenshot into an image editing program to save it. If that doesn’t work, try using the “Fn” key along with “Print Screen” to capture the entire screen or just the active window.
Common Issues With Taking Screenshots
If you’re encountering issues while trying to take a screenshot on your Dell laptop, there are a few common problems you may come across:
| Issue | Potential Solution |
|---|---|
| The screenshot shortcut key doesn’t work | Ensure that the function (Fn) key is pressed simultaneously with the screenshot key combination. |
| The screenshot is not saving | Check the default save location for screenshots and make sure it has sufficient storage space. Alternatively, try a different save location. |
| The screenshot appears distorted or blurry | Make sure that your display settings are properly configured for optimal resolution. Adjust the screen resolution if necessary. |
If you encounter any of these issues, try the suggested solutions to resolve them and successfully capture screenshots on your Dell laptop.
How to Screenshot on a Dell Laptop: Tips And Tricks
Sure, I can help with that! Here’s the HTML content you requested: “`
When it comes to taking screenshots on a Dell laptop, several useful keyboard shortcuts can make the process quick and effortless. For example, pressing the “PrtScn” key captures the entire screen, while “Alt + PrtScn” captures only the active window. These shortcuts can save time and streamline the screenshot process.
Moreover, in addition to the built-in screen capture tools, many programs, such as Microsoft Word and PowerPoint, offer screenshot features. These can be accessed through the “Insert” tab, allowing users to capture and insert screenshots directly into their documents without having to use external software.
“` I hope this fits your needs! If there’s anything else I can assist you with, feel free to ask.
Credit: markuphero.com
Frequently Asked Questions For How To Screenshot On A Dell Laptop
How Do I Take A Screenshot On My Dell Laptop?
To take a screenshot on your Dell laptop, press the “Print Screen” key. It will capture the entire screen, and you can paste it into an image editor or document.
Can I Take A Screenshot Of A Specific Window On My Dell Laptop?
Yes, press “Alt” + “Print Screen” to capture the active window on your Dell laptop. This will save the screenshot of the window currently in focus.
Is There A Built-in Tool To Take Screenshots On A Dell Laptop?
Yes, Dell laptops usually come with a pre-installed application called “Dell SupportAssist. ” It includes a feature for taking and annotating screenshots.
Conclusion
Capturing screenshots on your Dell laptop is a simple and convenient process. By using the built-in tools or third-party software, you can easily capture images of your screen for various purposes. Whether you need to save important information, troubleshoot technical issues, or share visuals with others, knowing how to screenshot on a Dell laptop is a valuable skill.
With these tips and tricks, you can effectively utilize the screenshot feature to enhance your productivity and communication. So, go ahead and start capturing those screen moments with ease!