
To connect Airpods to your Macbook, open the charging case near your Macbook and follow the on-screen instructions. If you encounter any issues, make sure both devices are within Bluetooth range and fully charged.
It’s common for Airpods to automatically connect after the initial setup. In today’s fast-paced digital world, the ability to seamlessly connect our devices has become essential for productivity and entertainment. Whether you’re working on a project, watching a movie, or listening to music, the convenience of using your AirPods with your Macbook cannot be overstated.
With the simple steps outlined below, you can effortlessly pair your AirPods with your Macbook and enjoy a wireless and immersive audio experience. So let’s dive into the straightforward process of connecting AirPods to your Macbook, ensuring you’re ready to enjoy the benefits of this seamless technology integration.
How to Connect Airpods to Macbook: Checking Compatibility
To connect AirPods to a MacBook, check for compatibility by ensuring that the Macbook runs on macOS Sierra or later. Then, open the Bluetooth menu, place the AirPods in the case, and hold down the setup button until the status light flashes.
Select the AirPods from the list and click “Connect. “
Checking Compatibility Before connecting your AirPods to your Macbook, it’s essential to ensure that they are compatible with each other. Here, we will guide you through the process of checking compatibility between your Airpods and Macbook. Below are the H3 headings in HTML syntax: “`HTML
Airpods And Macbook Models
“` When connecting your AirPods to your Macbook, it’s important to consider the compatibility between the two devices. Not all Macbook models support the same version of Bluetooth, and this can impact the connection with your AirPods.
Ensuring Compatibility
To check if your Airpods are compatible with your Macbook, you can refer to the following table that lists the Airpods and Macbook models:
| AirPods Model | Compatible Macbook Models |
|---|---|
| Airpods (1st Generation) | MacBook (Early 2015 or later) |
| Airpods (2nd Generation) | MacBook (Early 2016 or later) |
| Airpods Pro | MacBook (Early 2015 or later) |
It’s important to ensure that your Macbook model falls within the compatible range for the specific Airpods model you own. This will help to ensure a seamless connection between the two devices. After confirming compatibility, you can proceed to connect your AirPods to your Macbook and enjoy the convenience of wireless audio. By following these steps and checking for compatibility, you can ensure a smooth and hassle-free connection between your Airpods and Macbook. Now, let’s proceed to the next step of actually connecting the devices.
Credit: www.macinstruct.com
How to Connect Airpods to Macbook: Preparing Your Devices
To ensure a smooth connection between your AirPods and MacBook, it’s important to properly prepare your devices. This involves charging your AirPods and MacBook, as well as enabling Bluetooth on your MacBook.
Charge Airpods And Macbook
Begin by charging your AirPods and MacBook. Both devices must have adequate battery power to establish a stable connection. Use the charging cable for your AirPods case and the power cable for your MacBook to ensure they are sufficiently charged.
Enable Bluetooth On Macbook
Next, you’ll need to enable Bluetooth on your MacBook. To do this, go to the Apple menu and select “System Preferences.” From there, click on “Bluetooth” and toggle the switch to turn it on. Your MacBook will then begin searching for available devices, including your AirPods.
Connecting Airpods To Macbook
Want to connect your AirPods to your MacBook? Here’s how you can effortlessly pair them in a few simple steps:
Access Bluetooth Preferences
1. Open your Macbook and go to the top menu bar.
2. Click on the Apple logo and select “System Preferences.”
Pair Airpods With Macbook
1. Open the System Preferences window and click on “Bluetooth.”
2. Make sure your AirPods are in the charging case and the lid is open.
3. Press and hold the small setup button on the back of the charging case.
4. Your AirPods will appear in the list of available devices, click on them to pair.
5. Once connected, you will hear a chime confirming the pairing.
Credit: support.apple.com
Adjusting Settings
To connect AirPods to a Macbook, navigate to System Preferences, go to Bluetooth settings, and select your AirPods. Ensure Bluetooth is on and click “Connect. ” Adjust settings to customize your AirPods’ functionality for an optimal experience.
Customizing Airpods Options
Once you’ve successfully connected your AirPods to your MacBook, it’s time to customize the settings according to your preferences. Customizing your AirPods options allows you to enhance your audio experience and tailor it to your needs. Thankfully, Apple provides a range of settings that you can adjust easily. Let’s explore these options and make your AirPods truly yours!
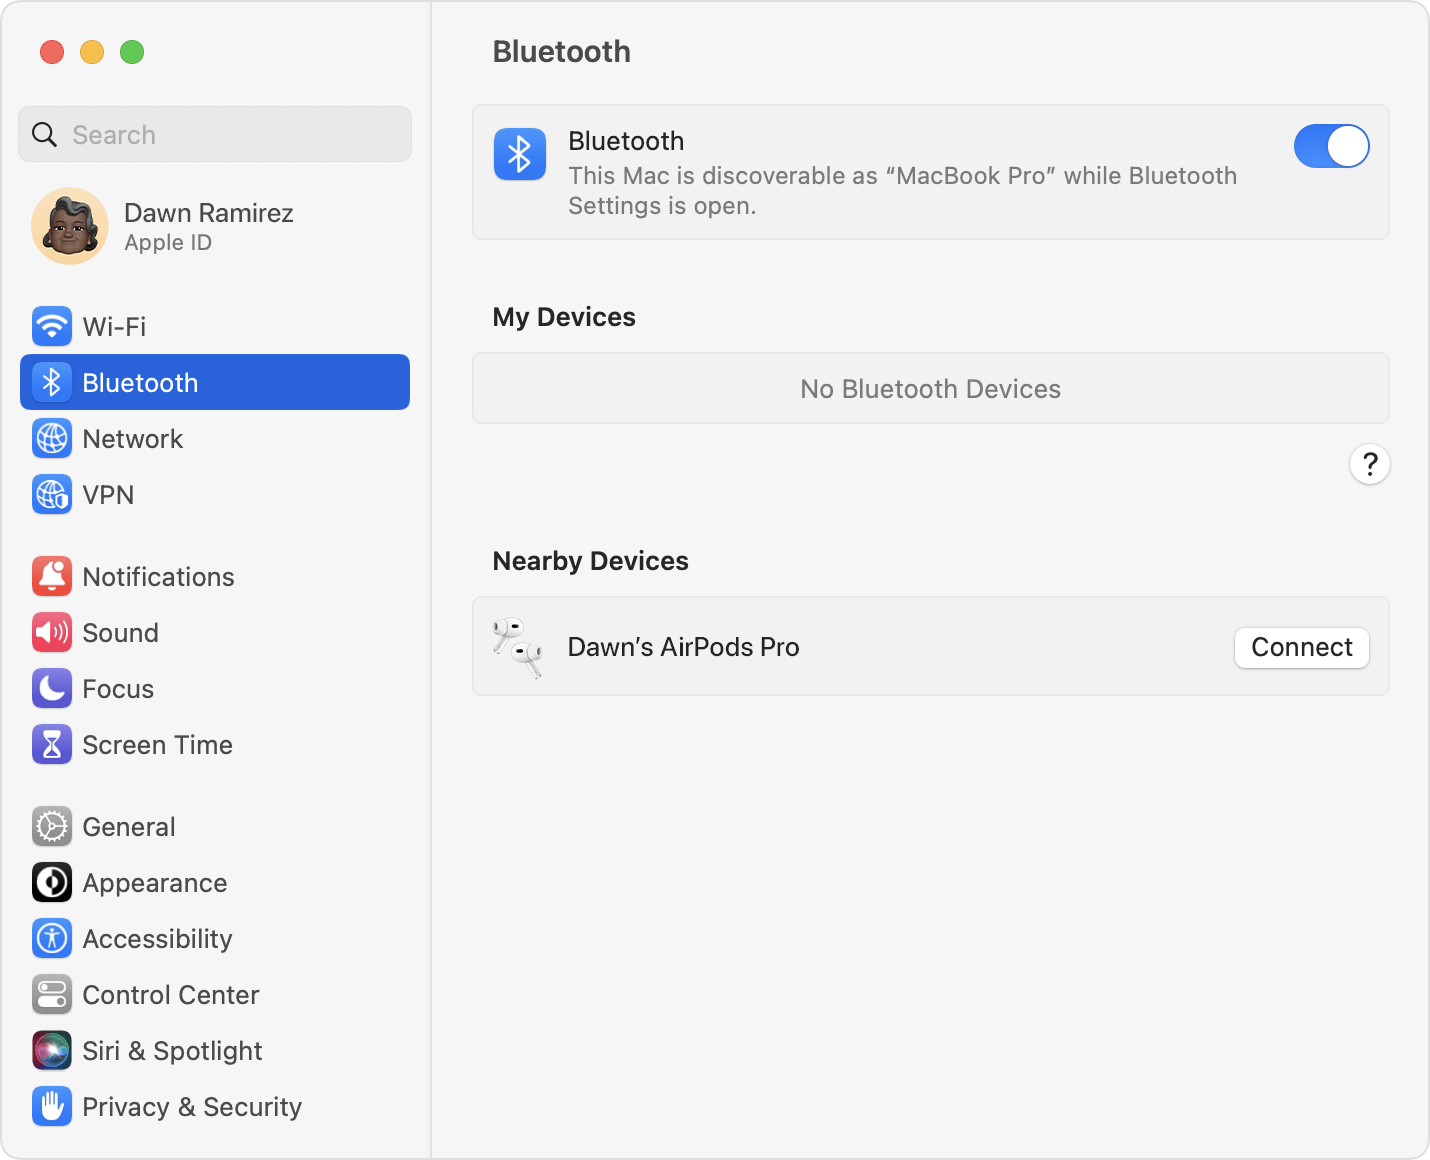
- Start by accessing the Bluetooth settings on your MacBook. Click on the Apple menu at the top left corner of your screen and select “System Preferences.”
- In the System Preferences window, locate and click on “Bluetooth.” This will open the Bluetooth settings panel.
- In the list of connected devices, you should see your AirPods listed. Click on the “Options” button next to your AirPods.
- A new window will appear, displaying various customization options for your AirPods. Here, you can adjust the microphone settings, control how your Airpods respond to taps, and more.
Adjusting Your Microphone Settings
- One of the key customizations you can make is adjusting the microphone settings. This allows you to choose the input device you prefer when making calls or using voice commands.
- In the Airpods options window, under the “Microphone” section, you’ll find a drop-down menu. Click on it to select the input device you want to use with your AirPods. You can choose to use the built-in microphone, the right or left Airpod, or even an external microphone if connected.
- Select the microphone option that best suits your needs, and you’re all set!
How to Connect Airpods to Macbook: Controlling Your Airpods With Taps
- Another feature worth exploring is the ability to control your AirPods using taps. This allows you to access certain functions without needing to reach for your MacBook.
- In the Airpods options window, under the “Double-Tap on Airpods” section, you can assign specific actions to each Airpod when double-tapped.
- To customize the action, click on the drop-down menu next to either the left or right Airpod and choose the desired function. You can choose to play/pause audio, skip to the next track, go back to the previous track, activate Siri, or disable the gesture altogether.
- Repeat the process for the other Airpod, if desired, and enjoy the convenience of controlling your Airpods with a simple tap!
Now that you know how to customize your AirPods options, you can tweak the settings to match your personal preferences. From adjusting microphone settings to customizing gestures, these options allow you to make the most out of your AirPods and elevate your audio experience to new heights. Take a moment to explore the settings and find what works best for you. Happy listening!
Managing Connections
Connecting AirPods to your MacBook has never been easier. Just follow these simple steps to manage your connections seamlessly and enjoy the convenience of wireless listening on your Mac.
Switching Between Devices
Switching between devices while using Airpods with your MacBook is quick and effortless. Whether you want to seamlessly transition from listening to music on your iPhone to a video on your MacBook or take a call on your iPad, the process is straightforward.
To start switching between devices, ensure that the devices you want to connect your AirPods to are within proximity and have Bluetooth enabled. Next, follow these simple steps:
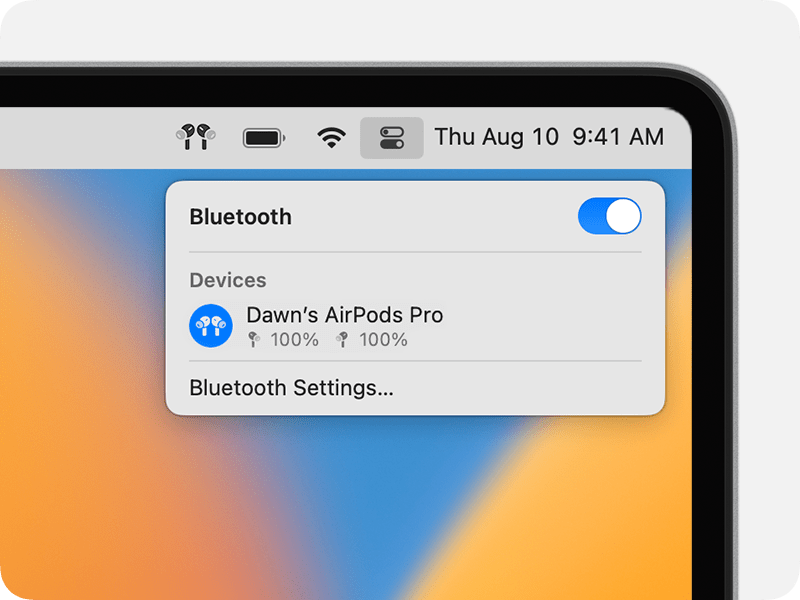
- On your MacBook, click on the Bluetooth icon in the menu bar. Select your AirPods from the drop-down list.
- Once connected, your AirPods will automatically switch to the MacBook. You can now enjoy audio on your MacBook without any interruptions.
- To switch back to your iPhone or another device, pause the audio or video on your MacBook. Your AirPods will then automatically connect to the last device used.
- If you wish to manually switch between devices, follow the same steps mentioned above to access the Bluetooth menu on your MacBook. Click on your AirPods and select “Connect” or “Disconnect” to switch between devices.
With these simple steps, you can effortlessly switch between devices and enjoy a seamless audio experience with your AirPods.
Disconnecting Airpods
When you’re done using your AirPods with your MacBook, it’s important to disconnect them properly to conserve battery life and prevent any unwanted audio playback.
To disconnect your AirPods from your MacBook, follow these steps:
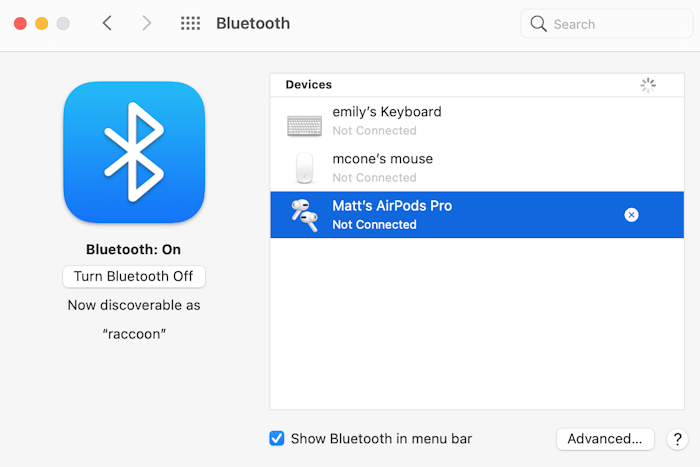
- Click on the Bluetooth icon in the menu bar on your MacBook.
- Locate your AirPods in the drop-down list and hover over them.
- Click on the “x” button that appears next to your AirPods to disconnect them.
By following these simple steps, you can ensure that your AirPods are disconnected from your MacBook, ready to be used with another device or simply to conserve battery when not in use.
Troubleshooting Tips
When connecting AirPods to your MacBook, you may encounter some common issues that can be easily resolved with a few troubleshooting tips. Let’s explore some solutions to ensure a seamless connection between your AirPods and MacBook.
Common Connection Issues
- AirPods not being recognized by the MacBook
- Poor sound quality or connectivity interruptions
- One AirPod not working
Resetting Airpods
- Place both AirPods in the charging case and close the lid
- Wait for about 30 seconds
- Open the lid and press and hold the setup button on the back of the case until the status light flashes amber
- Reconnect the AirPods to your MacBook
By following these troubleshooting tips, you can easily resolve common connection issues and enjoy uninterrupted use of your AirPods with your MacBook.
Frequently Asked Questions Of How To Connect Airpods To Macbook
How Do I Connect Airpods To Macbook?
To connect your AirPods to your Macbook, make sure Bluetooth is enabled on both devices. Open the lid of your AirPods case, then go to the Bluetooth settings on your Macbook. Select your AirPods from the list of available devices and click Connect.
You’re all set!
Can I Connect Airpods To Multiple Macbooks?
Yes, you can connect your AirPods to multiple Macbooks. Simply follow the same steps to connect them to each Macbook you want to use them with. Once connected, you can easily switch between your devices by selecting your AirPods from the Bluetooth settings.
How Do I Disconnect Airpods From Macbook?
To disconnect your Airpods from your Macbook, go to the Bluetooth settings and click on the “X” next to your Airpods name. This will remove them from the connected devices list and disconnect them. Remember to put your AirPods back in their case when you’re done using them.
Why Won’t My AirPods Connect To My Macbook?
If your AirPods won’t connect to your Macbook, make sure Bluetooth is turned on and your AirPods are charged. Try resetting your AirPods by pressing and holding the setup button on the back of the case until the LED light starts flashing.
Then, try connecting them again.
Conclusion
Successfully connecting your AirPods to your Macbook can enhance your audio experience. By following simple steps, you can easily pair them to enjoy seamless connectivity. Now, you can effortlessly switch between devices and immerse yourself in your favorite music or calls.
Stay connected and enjoy the convenience of wireless listening with your AirPods and Macbook.